
Tuesday July 28, 2009
Tuesday July 28, 2009
Mighty Midgets!
A Sprint Car Build
by Mike Aplet
Here is a step by step article on how to build and race these great models!
I have started my second of three planned 1/25
scale midgets. These midgets fit the Sprints Plus Chassis. They can also be
adapted to a variety of of other 1/32 chassis. For those of us with 1/32 tracks,
the smaller 1/25 midget will allow us to dabble in 1/25 scale without resorting
to buying or building a full sized 1/24 track. Sprints Plus and Pattos Place
carry vacu-form versions of sprint cars & midgets but I am a fan of hard bodies.
The flimsy vacu-form shells just doesn't do it for me.

My hard body midget starts off as an AMT, Grant King 70's
vintage, sprint car kit. This kit also comes with a wedge shape super modified
body in the box. Since I will only use the nose, cowl, seat and tail sections I
will have a bunch of extra parts for kit bashing or I can send them to Harry
where I am sure they will be put to good use. (cool, Thank you,
I will take them!)
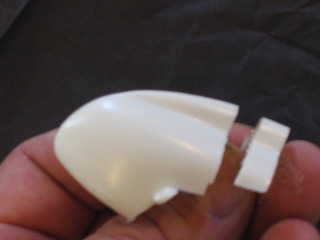
To cut the sprint car to midget size, I start out by shortening
the tail section. In this photo, I had cut off approximately 1/4 inch from the
front. When I held the piece up to my already completed midget I realized that I
hadn't cut enough the first go'round. I got out the hack saw and cut half again
as much which amounts to approximately 3/8 inches total. This isn't a hard and
fast rule. Just cut to what looks good to your eye.
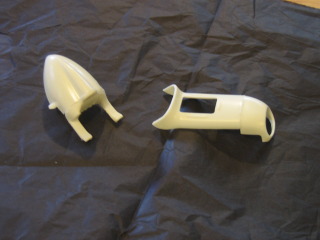
After trimming off the bottom of the drivers seat flush to the
bottom of the armrests on each side, the seat was glued to the tail section. I
also trimmed the lower front of the nose and glued the nose to the unmodified
hood/ cowl section.
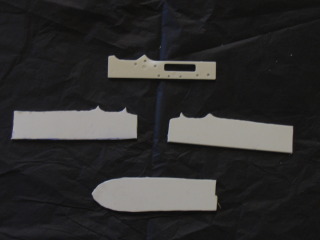
Next, I rough cut two side panels and a chopped of surfboard
looking piece from 0.40" styrene sheet. I like the thicker stuff because it is
easy to use. It leaves plenty of thickness to file and sand contours later. On
this car I will leave the side panels a bit longer on the lower edge than I did
on the first car. This will allow the panels to fit all the way down to the
bottom of the SP chassis. The side panel on the top of the picture is the kit
piece for comparison.
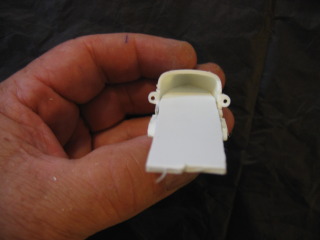
I whittled down the surfboard to fit inside the inner contour of
the tail section. The square end is trimmed to fit the inner sides of the cowl
section. The surfboard piece is glued into the tail section and at the bottom of
the armrests of the seat. This piece will act as a cover to the slot car motor
residing underneath and as a backbone tying the nose, seat and cowl sections
together.

I now have a completed tail section and nose section. I didn't
get a picture but this is a good time to install your dash panel which will glue
inside the cowl and run down to the backbone. Also pictured are the rough cut
side panels. A note on the side panels. The side panels set the height and the
distance forward of the cowl section To further shorten the car overall and
lower the cowl height to approximate a midget in size, I made new pieces rather
than using the kit pieces. By lowering the cowl section, I am able to slide the
bottom rear corner of the cowl rearward and downward where it fits under the
forward portion seat arm rests. I loose approximately 1/4 inch of length in the
drivers section and about 3/16 inch in cowl height this way. The cowl or nose
pieces were not shortened.

After fitting the side pieces and filling in the cowl cutout for
the Sprint car V8 intake, the tail and nose sections and side panels are glued
in place. After the glue is dry, the body can be trimmed to fit the chassis and
the rough spots sanded and contoured. I have another Sprints Plus chassis on
order from Smith Scale Speedway. When it arrives I can complete the car to a
somewhat similar detail to the first. I may set this car up with two side pipes
to resemble a flathead V8/60 Ford motor.
Stay tuned for part 2!
- Mike A\